Projects
About Me
Find Me
Portfolio
All Posts:
- Ham Radio: 9:4:1 Impedance Matching with a Homemade Autotransformer
- RISC Processor, Custom ISA, and compiler
- Newspaper Article: Competing in Science Olympiad
- Newspaper Article: Hosting a Learn to Solder Day at LASA Electronics Club
- Animated LED map of territorial expansion in the modern day German region + Road trip!
- Another Blog Post About This Blog (updates!)
- Updates and Future of the Blog
- MathMl: Easy Embedded Math in HTML (No extra libraries, browser supported!)
- Raymarching: Perfect Spheres and Easy 3D
- Never Write a Line of CSS Again
- Jinja is Awesome
- A Blog Post About This Blog
Newspaper Article: Hosting a Learn to Solder Day at LASA Electronics Club
2026-2-28
The following was a newspaper article I wrote for a local neighborhood newspaper about a learn to solder day which I hosted at my school using custom PCBs. Technical details are provided after the article.
At the start of this year, I started a small Electronics Club at my school with some members of our school’s Amateur Radio Club. So far, we’ve mostly just been doing presentations on various components and topics, but I wanted to host a workshop where we taught people how to solder.
Soldering is making electrical connections between components by melting a thin piece of metal alloy (known as “solder”) to attach two pieces of metal together. It is similar to welding, but on a much smaller scale and at much lower temperatures. Most of the soldering you do with electronics is soldering components, like LEDs, computer chips (known as ICs or integrated circuits), or resistors onto circuit boards. In order to solder, you need a soldering iron, which is a tool with a really hot tip, and solder, which you will melt with the soldering iron.
I decided to create some simple circuit boards that people could solder components onto and have them do something. I designed a small 3-note musical keyboard with 3 little tactile buttons and knobs to change the pitch of each. Instead of a speaker, I put a spot for a buzzer on the board, which people would also have to solder onto. I designed the board using the program KiCad, which makes laying everything out very easy. If you’re interested in learning how to design circuit boards with KiCad, I would recommend Phil’s Lab on YouTube, he has a good tutorial series putting together a board for the STM32 microcontroller. Once I had the boards designed, I ordered them from the company JLCPCB in Hong Kong. It only cost $7.80 for 20 of them, which comes out to only $0.39 per board.
Once I had all of the boards and components, I sent out an advertisement in Blend (the website our school uses for our online assignments). Surprisingly, we had more than 20 people show up at lunch, so some people had to share boards. I gave a quick presentation at the start explaining how to solder and then let people get all of the equipment they needed. Our club sponsor had a bucket of about 20 soldering irons that we were able to use. For the rest of the lunch block, people worked on the boards, and some other more experienced people and I walked around and helped folks out. By the end of lunch, about half of the people had finished and had working musical keyboards. I told the rest who hadn’t finished that they could come back during our next meeting to finish up their boards.
Overall, the event seemed to have been a success. We had a good turnout, and a lot of people who had never soldered before got some good experience. I also got to design a circuit board, which is always fun to do. If you are interested in learning to solder yourself, there are tons of cheap kits online, and you can pick up a soldering iron from most hardware stores or online for around $20. You can buy kits for homemade radios, synthesizers (electronic music equipment), guitar pedals, headphone amplifiers, and all sorts of other things. If you don’t know what you’d like to do, you can just look up “solder project” on AliExpress or a similar Chinese shopping site and find something cheap. Once you get the basics down, you can learn to read electronics schematics and can make just about any circuit you can find online on prototyping boards, which is a great way to get into electronics as a whole.
 The poster sent out to Blend (sponsor name removed for privacy)
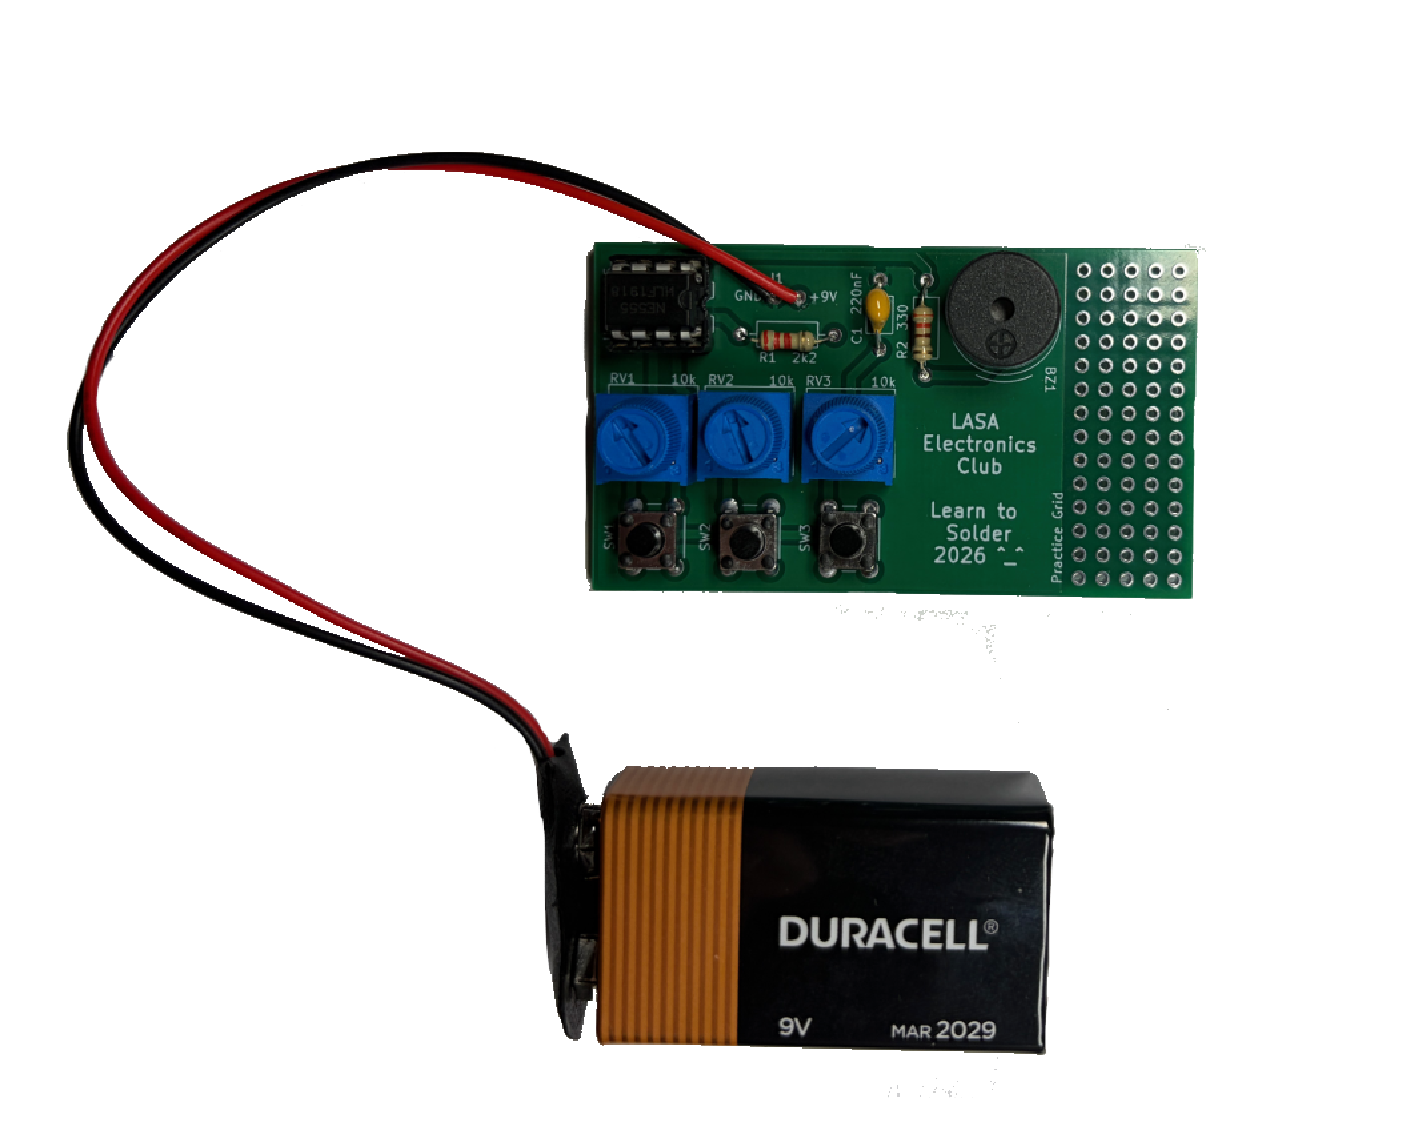 Completed circuit board
|
 Stack of unsoldered PCBs
|
Technical details
Not a part of the newspaper article.
The circuit itself is a very simple TLC555 astable oscillator circuit with its output hooked up to a small buzzer. In order for the keyboard to work, three buttons were placed in series with potentiometers which were in turn connected to a capacitor, allowing you to change how much current and therefore how quickly the capacitor could charge and discharge. The whole circuit was designed to be powered off of a 9V battery, but it would have operated off of anywhere from 2-15V. The hole sizes spacing for the buzzer was slightly off, but you could bend the pins easily enough.
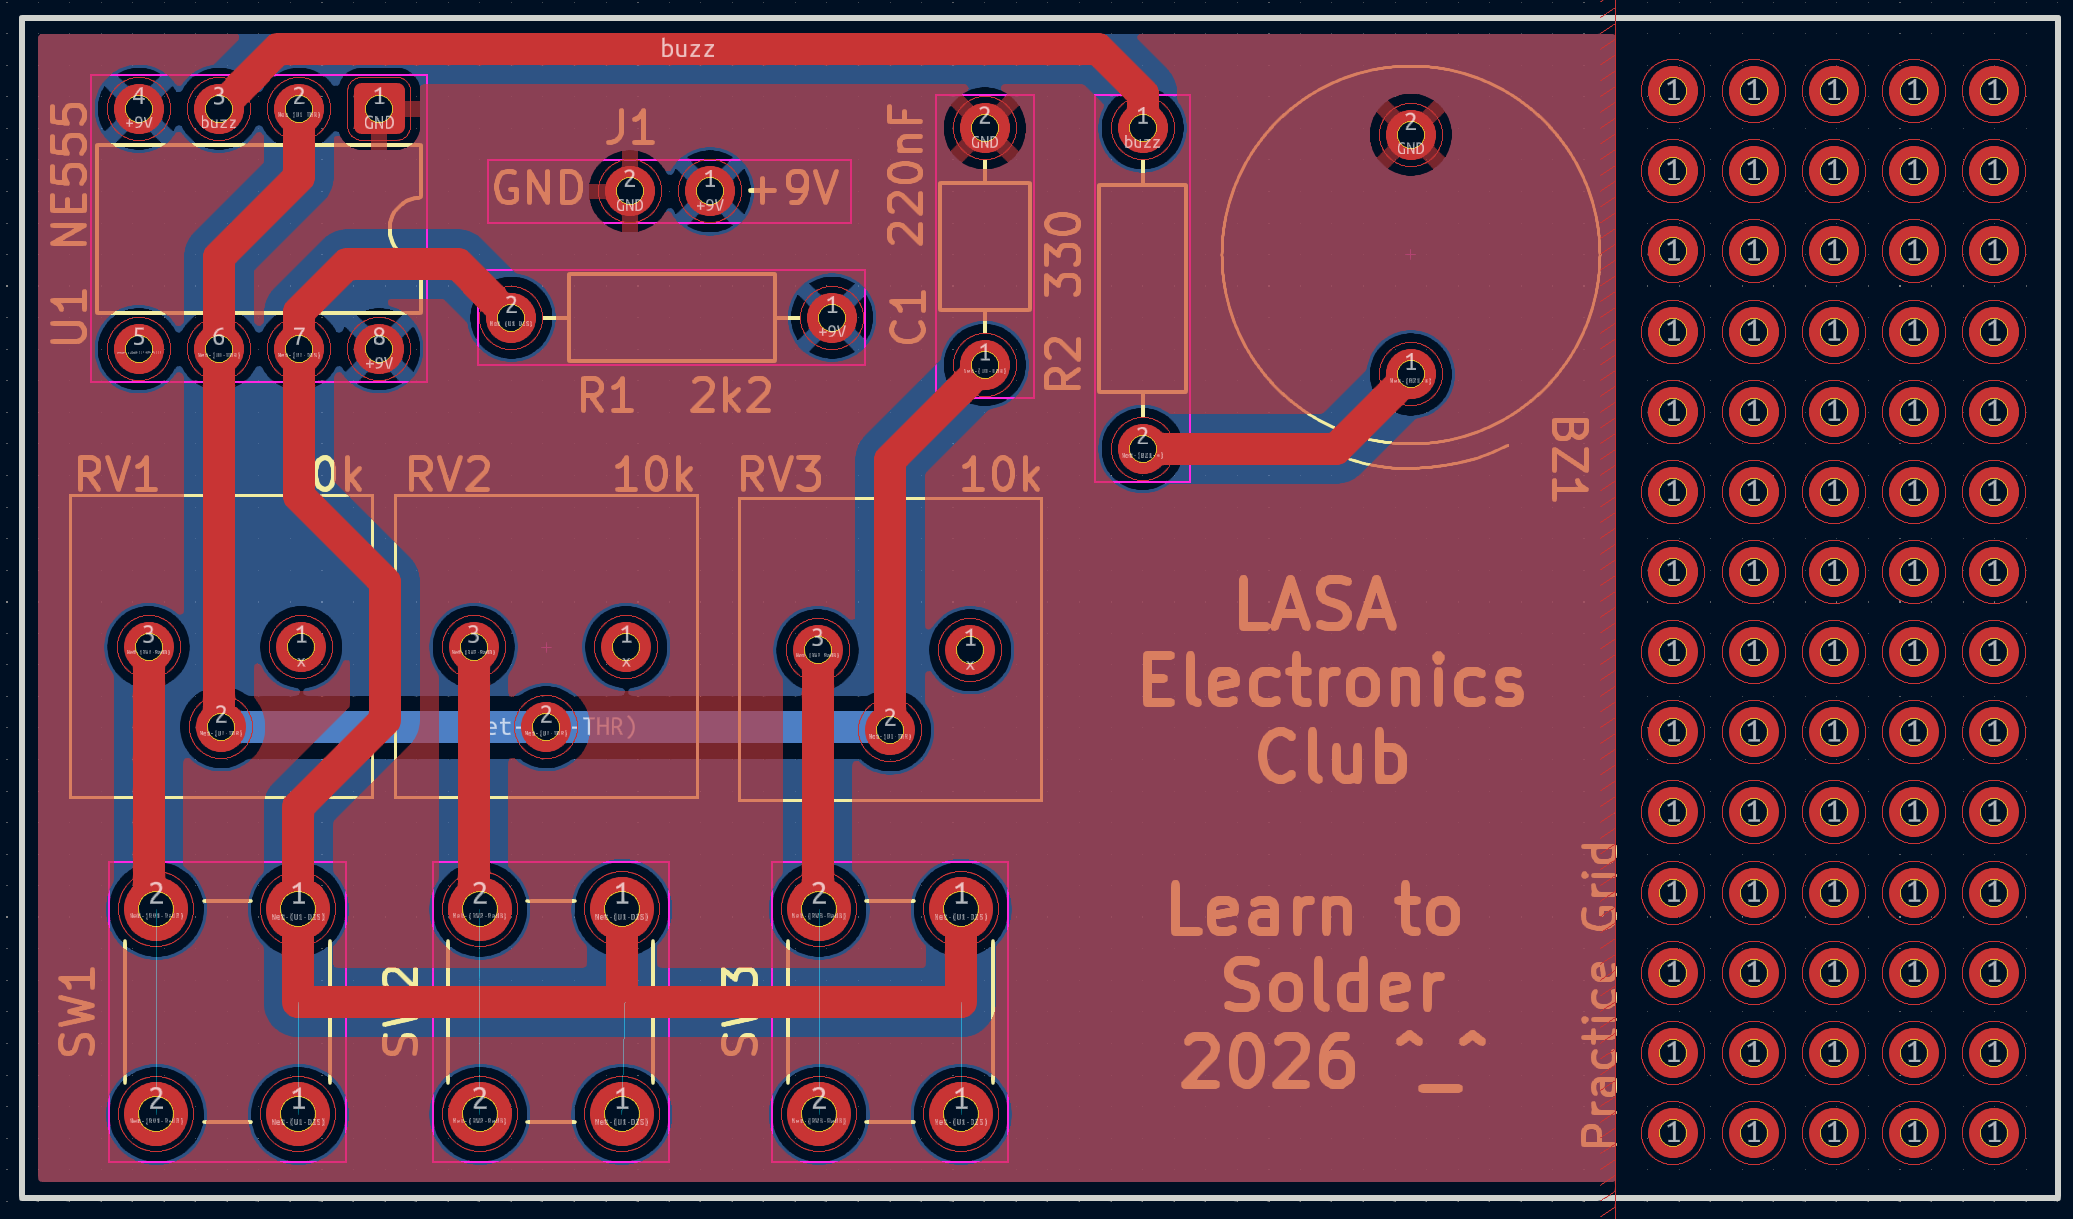 Board layout
|
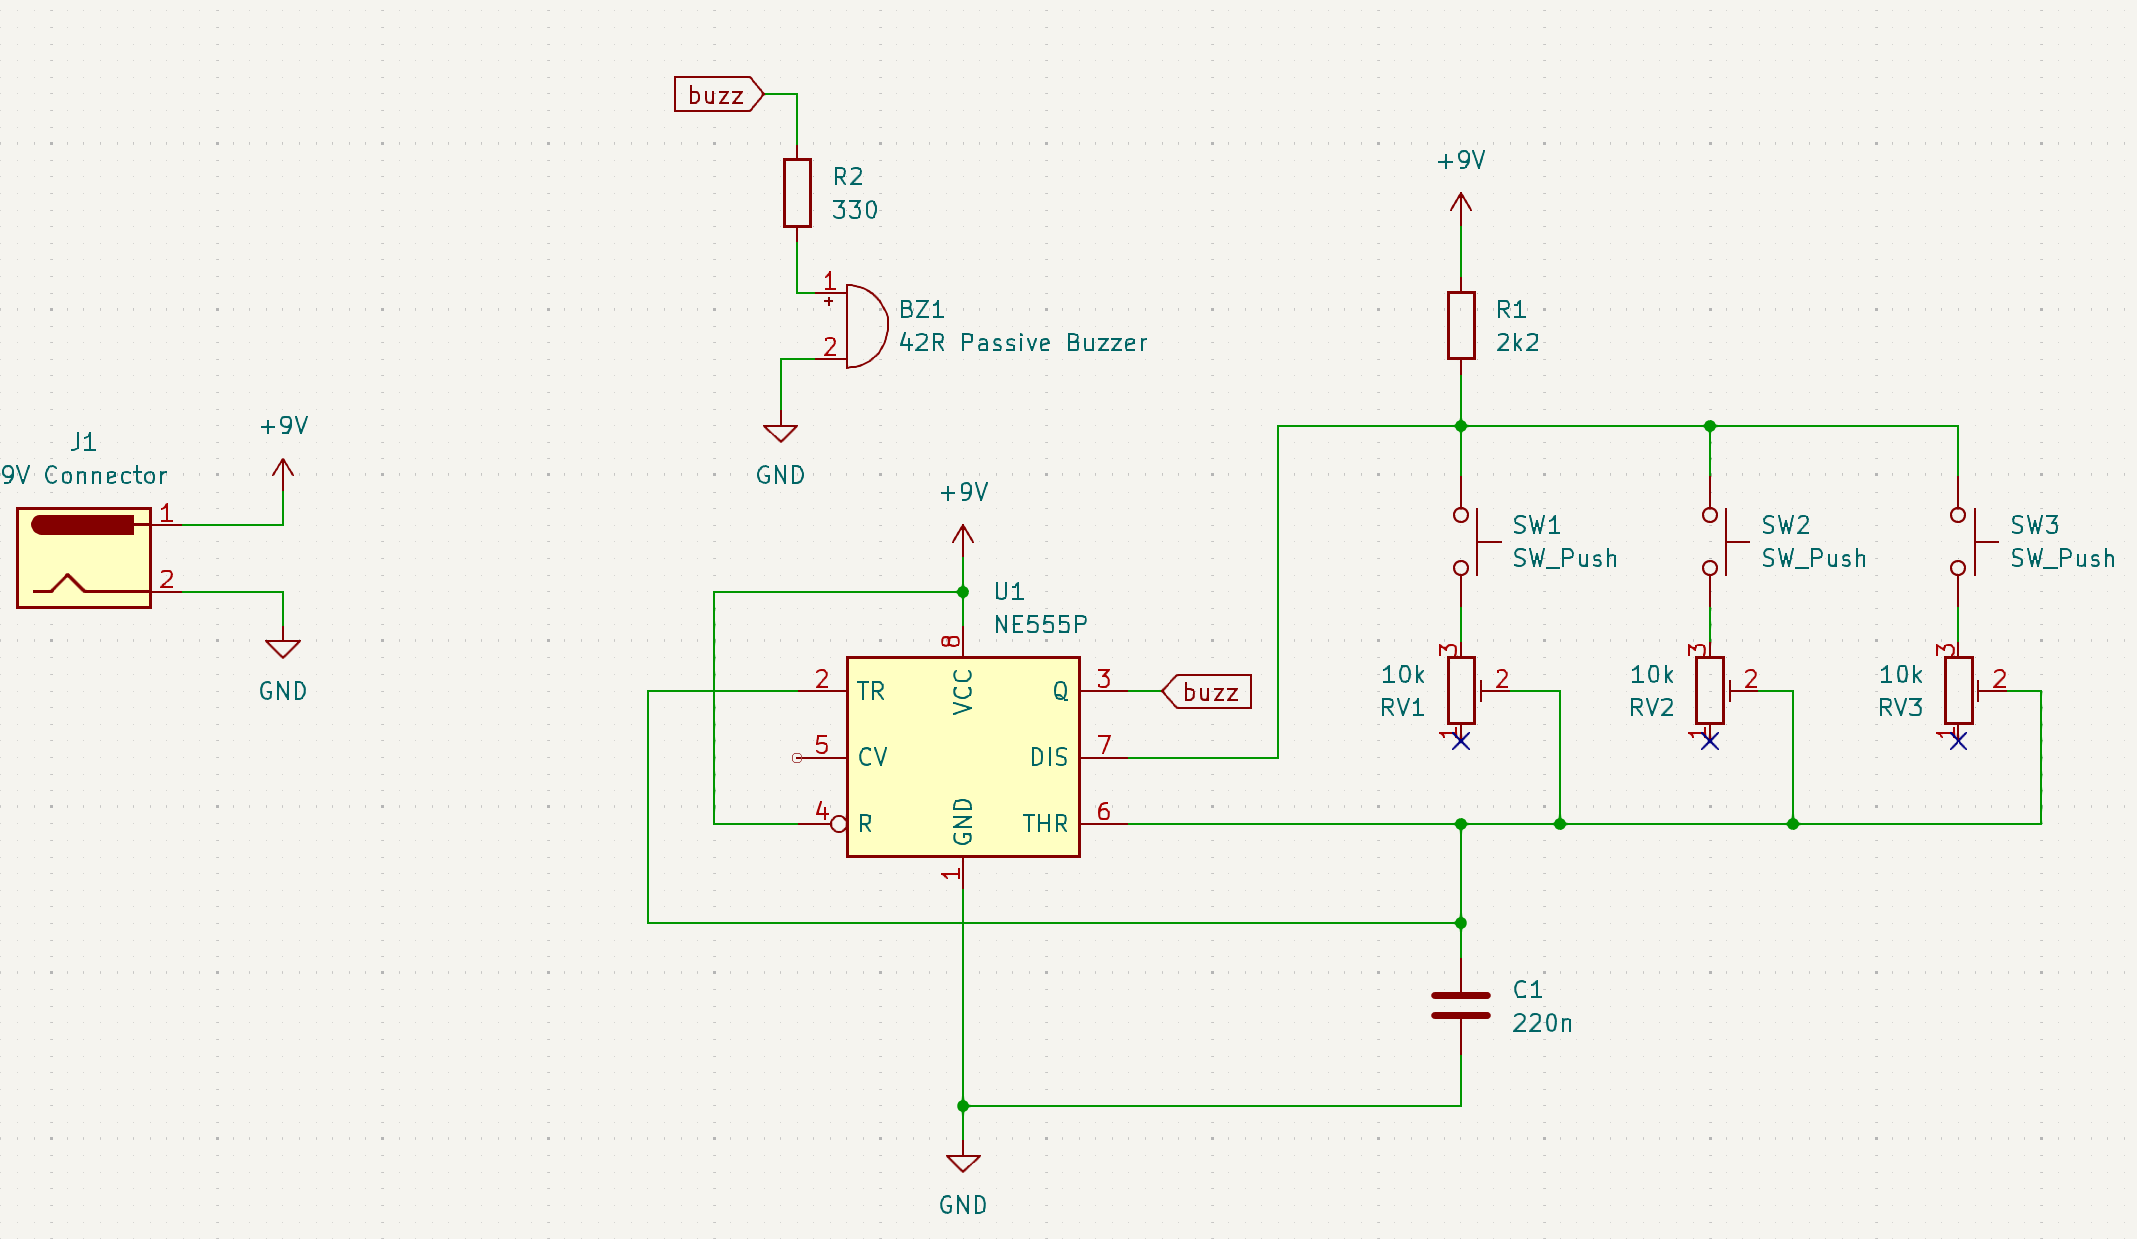 Schematic
|
Future years / lessons learned
I would definitely like to host another workshop similar to this in the future, but there are some things I would like to do differently. Here are some of the things that either worked well or will be changed in future iterations of this:
-
Pre-prepare components for people - I wasn't sure if many people were going to come so I ended up just laying out all of the components on a table in piles and having a number of components each person should take. Since we had much more people than I expected, this ended up taking quite a while to get everyone through and some people ended up taking too many leaving the people at the back of the line with only enough components to partially complete a board. I have a ton of small baggies from various components I have ordered, so next time I will probably pre-package the components for each kit.
-
Board size/component count - The number of pins (~39) was good and most people were able to finish in a single lunch block. Keeping the total pin count under or around 50 seems like it is accomplishable in a lunch block.
-
Complexity - While the simple board was very easy to design and did have a cool practical effect, there was not much to analyze after the fact. For future workshops, I would like to try and tie them into deeper topics, such as a potential impedance matching presentation with a workshop tied into it.
-
Organizing beforehand - While the event itself went rather smoothly, the only real problem was that not everyone that showed up was able to build a board as we did not plan for the amount of people that showed up. In the future, we will likely send out some sort of interest form beforehand to gauge interest and properly purchase materials.
Also I didn't mention this in the article, but after everyone got all of the components and irons and we started to walk around to help people out, we realised we had forgotten to give anyone solder TwT. We quickly found a roll and broke strands off for folks.
Overall I'd say the event went well and I am happy I ended up going through with it.
Thank you for reading! Have a good day! ^_^
Comments
Post a comment:
Please don't spam the comments, I get a notification every time. Also please be mature (Nolan)
Message limit: 1500 characters, name limit: 100 characters
No comments here yet. You should write one!